
Friday, April 29, 2011
Tomatoe babies
One of lifes sweetnesses are seedling plants. Here are some brand new baby tomatoes, paprikas and thai basilika.

Thursday, April 28, 2011
Shifty triangle mittens pattern

Stranded knitting.
Knitting in the round.
Decreasing.
Picking up stitches.
If this is your first try at a mitten, you might want to look at another, more descriptive pattern too. This is a simple pattern for experienced mitten knitters.
Do you want a pdf copy of this pattern? Click this!
Yarn: Drops Delight,
Color nr 10
50gr = 175 meters (1,76 oz = 191 yards)
I used about 75 gr of yarn for my mittens.
Tension: 26 stitches x 34 rows = 10 x 10 cm (4" x 4")
Needles: 2,5 mm double pointed needles/US 1 or 2
Pattern:
The yarns is varigated and knitted stranded, using either two balls of yarn or one strand from the outside of the ball and one strand from the inside of the ball. This causes the shifting of colors throughout the pattern. The two strands of yarn may become very like in color during your work. If this happens cut one strand (and secure in the stitches weaving in the end) and discard enough yarn to clearly see the shift in color between the strands. Secure the end in the stitches and start again.
Cast on 66 stitches.
Divide stitches on needles, 16+17+16+17.
Knit one closing the round, making sure the stitches are not twisted. Continues knitting 2 rows in one strand of yarn.
K1 in the lighter shade, p1 in the darker shade. Repeat for 2 rows. (or more according to tase)
Knit one row in the darker shade.
Start diagram nr 1:
 |
| Shifty triangle mittens diagram nr. 1 |
Make note of this, I have made several pairs of mittens that have the thumb on the same side, it's very easy to miss... But of course, you are smarter than me!
Continue knitting the diagram.
When you get to the decreases, I found it easier to make the decrease with both strands of yarn. If you do this make sure you are really decreasing as you should, since you've got two strands of yarn in the last stitch.
For the right hand decreases I used a k2tog tbl.
For the left hand decreases I used a k2tog.
When the diagram is finished, cut your yarn, pull the ends through the remaining stitches and secure them well, weaving them in the stitches on the back.
Thumb:
Pick up the stitches on both sides of your thumb thread, adding two stitches on each side making 16 stitches on each side of the thumb.
Knit according to diagram 2:

Knit in the same way as the mitten, the back side is the same as the front. The pattern is a 2x2 stitch square as seen in the drawing. When weaving in the ends make sure to sew closed any holes between the thumb and the mitten.
Wash and block.

Good Luck!
Monday, April 25, 2011
A cute little purse that I will never make..
Isn't this the cutest little thing? Unfortunately I will never make one, it's probably one of those things that are sooo very dute, nice, unresistable, wonderful and all theese other things. And something that I really don't want to own, just admire from afar.
But just maybe you want to make it, and I can admire yours!

365 saker du kan sticka: #358 Dots and stripe purse: "
But just maybe you want to make it, and I can admire yours!
365 saker du kan sticka: #358 Dots and stripe purse: "
Friday, April 22, 2011


Friday, April 15, 2011
Shifty mitten on the needles
I'm slowly progressing on the shifty triangle mittens. The first one is finished and I'm working on the second at the same time as the pattern is written. I'm not very accomplished at pattern making so it's... well, confusing! Hopefully the final result will not be confusing.
Friday, April 8, 2011
Mug rug tutorial
I've been making crazy quilt mug rugs out of scraps. Start by putting some Joni Mitchell on the CD, I cannot guarantee a good result without her.. ;-)
Let's see what's in the scraps today...

Start sewing pieces together with a quarter inch seam allowance. Don't put too much thought into it, just find scraps and sew.
Sometimes the scraps are too big, I sew them on first and adjust the size later, I find it easier to see the design that way.


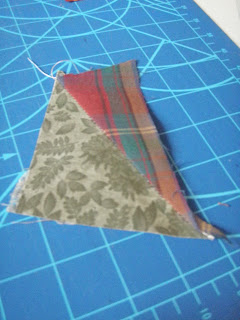
This mug rug is going to be small, just 4 x 6 inches, just enough for a mug and a cracker. When you feel happy with the design and size of your top, cut it to size.

Now cut a piece of backing and a piece of batting half an inch larger than your top. (I didn't do this... but do as I say not as I do...) My batting is an old wool blanket, leftover from a quilt, and my backing an antique sheet-scrap.

Sandwich them and pin.

Then quilt. I chose to quilt in the ditch, sewing just next to the seam on the side that doesn't have the seam allowance under it, if I had used a better color thread this would have made the quilt seams almost invisible.

Now cut to size and bind. There are easier/faster ways to bind a mug rug, but I do it the same way as my full size quilts. See the binding tutorial.

Good luck!
Comments are appreciated.
Let's see what's in the scraps today...

Start sewing pieces together with a quarter inch seam allowance. Don't put too much thought into it, just find scraps and sew.

Sometimes the scraps are too big, I sew them on first and adjust the size later, I find it easier to see the design that way.


This mug rug is going to be small, just 4 x 6 inches, just enough for a mug and a cracker. When you feel happy with the design and size of your top, cut it to size.

Now cut a piece of backing and a piece of batting half an inch larger than your top. (I didn't do this... but do as I say not as I do...) My batting is an old wool blanket, leftover from a quilt, and my backing an antique sheet-scrap.

Sandwich them and pin.

Then quilt. I chose to quilt in the ditch, sewing just next to the seam on the side that doesn't have the seam allowance under it, if I had used a better color thread this would have made the quilt seams almost invisible.

Now cut to size and bind. There are easier/faster ways to bind a mug rug, but I do it the same way as my full size quilts. See the binding tutorial.

Good luck!
Comments are appreciated.
Mug rugs
It's been awhile... I've been taking it easy bitten by the lazy bug. But I haven't been completely idle, in an effort to close the top on my scrap bin I've been making mug rugs. Loads of fun!


Subscribe to:
Posts (Atom)